In a recent patent application by ArcelorMittal, hyperspectral imaging is used to monitor the quality of a coating process in which a polymer coating is applied to a metal substrate.
The application of a PET or PVC coating to a steel plate improves, among others, the corrosion resistance, chemical resistance and cleanability, and makes the material suitable for aggressive, humid environments or contact with food. Polymer coating films are usually laminated to the metal substrate, heated and then quickly cooled. Rapid cooling inhibits the formation of a crystalline phase in the polymer, leaving it partly amorphous. The degree of crystallinity largely determines the properties of the coating and is therefore an essential quality parameter.
Measurement of crystallinity of polymer coating
In a patent application (WO2020/128687 A1 dated 25/6/2020) ArcelorMittal describes how hyperspectral imaging is used for a more accurate and complete measurement of the crystallinity of a polymer coating. Existing methods based on Raman spectroscopy or infrared spectroscopy fall short because they measure the crystallinity in only one point across the width of the substrate. The longitudinal distance between these points depends on the speed at which the substrate passes under the measurement setup and the acquisition time of the method used, which can be several seconds for Raman spectroscopy. With hyperspectral imaging, it is possible to measure the crystallinity of the coating across the entire width of the substrate at a high acquisition rate. An additional shortcoming of Raman spectroscopy is the powerful light source that can locally heat and degrade the coating by promoting the formation of the crystalline phase.
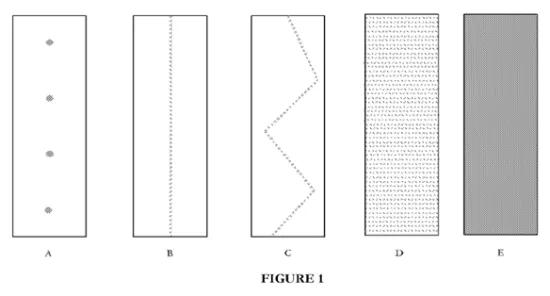
Figure 1 (source: WO2020/128687 A1) illustrates the distance between two consecutive measuring points.
- A: Raman spectroscopy, long acquisition time
- B and C: infrared spectroscopy
- D and E: hyperspectral imaging
Figure 2 (source: WO2020/128687 A1) shows a measuring setup based on hyperspectral imaging, with which the substrate passing under the setup is imaged over the full width and thus the quality of the coating is monitored over the entire surface.
- 1: coating
- 2: metal substrate
- 3: hyperspectral camera
- 4: polychromatic light source
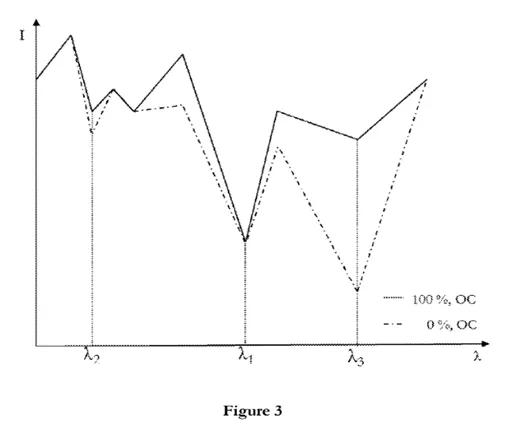
The method used by ArcelorMittal to determine the crystallinity of the coating consists of identifying two specific (groups of) wavelengths: a first wavelength for which the measured intensity does not depend on the crystallinity of the coating, and a second wavelength for which the measured intensity strongly depends on the crystallinity. Figure 3 (source: WO2020/128687 A1) shows the intensity curves as a function of wavelength for two different coatings, one 100% crystalline (solid line) and the other 100% amorphous (broken line). The spectra show that wavelength lambda1 is insensitive to the crystallinity, whereas the measured intensity for wavelength lambda3 is strongly dependent on the crystallinity.
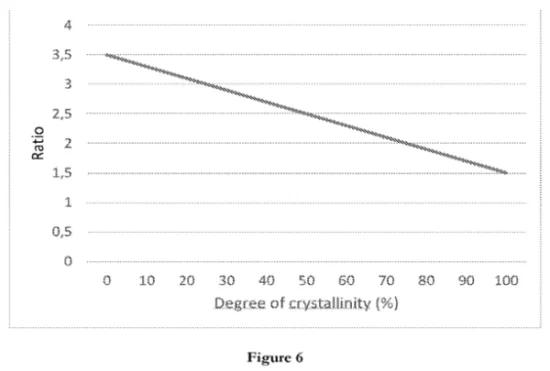
A measurement in an industrial environment rarely takes place in optimal conditions and must be robust to changes in light, humidity and vibration. By working with a ratio of intensities at two different wavelengths, one of which is insensitive to crystallinity, the impact of external conditions on the measurement result is minimised. Figure 6 (source: WO2020/128687 A1) shows how the ratio of the measured intensities for wavelengths lambda3 and lambda1 is a measure of the crystallinity of the coating.
Importance of infrared and measurement angle
In its patent application, ArcelorMittal uses an infrared light source (700 nm to 0.1 mm) to measure the crystallinity of a pet-coating, and notes that wavelengths between 10.3 and 10.7 µm are particularly sensitive to variations in crystallinity. Wavelengths between 9.5 and 9.7 µm, on the other hand, appear to be almost insensitive to this and can therefore provide a reference to make the measurement robust to the measurement conditions.
Finally, ArcelorMittal also notes that the angle at which the hyperspectral camera is aimed at the metal substrate plays an important role in ensuring correct measurement. The more obliquely the hyperspectral camera is aimed at the metal substrate, the longer the light beam travels through the coating, making intensity differences easier to measure. On the other hand, measurements with a camera positioned at too great an angle become sensitive to vibrations in the substrate. A setup at an angle of 45° appears to be a good compromise for obtaining a clearly measurable intensity difference with a limited influence of vibrations.
Do you want to know more about the options of hyperspectral imaging for your application? Sirris can support you in studying the feasibility of a vision solution based on hyperspectral imaging.
Source
WO2020/128687 A1 (ArcelorMittal, 25/06/2020): Measure of the degree of crystallinity of a polymer coating on a metal substrate
The Sirris Patent Unit is supported by the FPS Economy.


